


Grow your own mushrooms with Inner Visions Mushroom Growkit Manual

Want to grow your own magic mushrooms cheaply and easily? You can do this with the help of a growkit. It's not difficult at all and you don't need to have green fingers. What is important is that you read the instructions carefully. In this blog I will explain step by step how to use the mushroom grow kit from Inner Visions. This is probably a little more difficult to use than the regular mushroom grow kits 100% mycelium for sale at Sirius. Read this manual carefully and you are ready to get started with Inner Visions!
In my quest for self-sufficient living, mushroom grow kits and cannabis seeds take up an important place. Growing your own psychedelics is satisfying, cheaper and in many cases better quality. Plus, you get to know your own power and discover the magic of something beautfiful that grows, just for you!
Maybe it's between my ears, but I have had the best trips on Magic Mushrooms from home cultivation. Being stoned or high is also much more enjoyable when you know that your cannabis buds were self-harvested from plants you raised. A beautiful process to be thankful for.
Magic Truffles easy dosage for the novice psychonaut
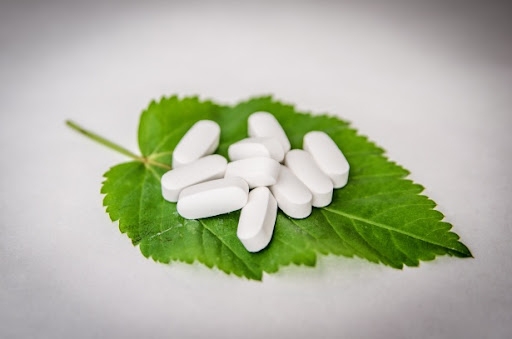
Are your fingers itching to get started yourself? If you've never had a psychedelic trip before in your life, it's smart to start with magic truffles first. These are packed in well-balanced doses and therefore guarantee a more or less fixed strength in terms of effects. If you are going on a psychedelic trip for the first time, it is recommended to start with a low dose. Magic truffles are a perfect way to enter this magical world safely and with pleasure. Many beginners take half a "trip dose" the first time. A normal dose is around 10 to 15 grams. So 5 to 7.5 grams is a fine portion for the beginning psychonaut. Choose for example Dolphins Delight or Golden Teacher. Above all, choose the strain that appeals to you the most.
Mushroom growing for the advanced psychonaut
Are you ready to take on the adventure? Don't worry, the chances of success are very high. Sirius regularly receives positive reviews from customers who have completed their growing adventure with great success. Harvesting your mushrooms is a wonderful moment you have been waiting for with patience. Patience is rewarded. Before you order a grow kit it is wise to read the manual carefully.
Inner Visions Growkit manual
With this manual you learn how to grow mushrooms in an easy and reliable way. In three short steps you will prepare a grow kit from which you can harvest several times.
After setting up the grow kit and watering it once, all you have to do is wait for the mushrooms to start growing.
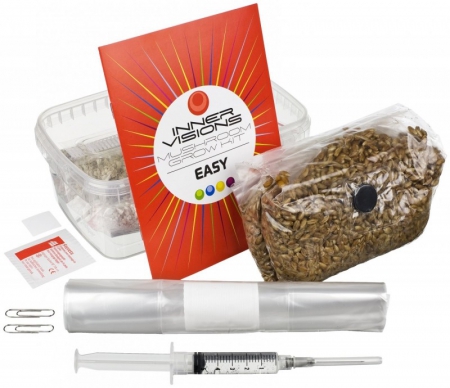
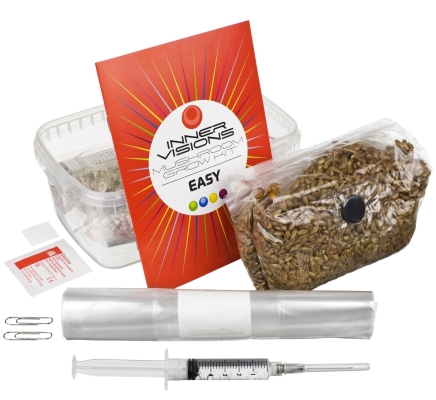
Contents Inner Visions Growkit Easy:
- 1 Mushbag with 425 g sterilized rye
- 1 syringe (filled with 5 ml spore mix)
- 1 culture container (1200 ml) with air filter
- 1 grow bag with air filter
- 200 ml vermiculite
- 1 alcohol swab
- 2 paperclips
What else do you need:
- Lighter
- Clean spoon
- Clean scissors
Step 1: Injecting the spores
1. Clean the injection port
Wash your hands thoroughly with soap and water. Use the alcohol wipe provided to disinfect the injection port. Do not touch it again after this.
2. Heat the needle
Shake the spore syringe for about 5-10 seconds to distribute the spores evenly. Remove the protective cap and hold the needle in the flame of a lighter until it glows red. Make sure the needle cools completely (15 to 20 seconds)
3. Injecting the spores
Carefully pierce the (cooled) needle through the injection port and empty the syringe. If the flow blocks, gently pull the needle back a little.
4. Incubation
Place the Mushbag in a warm, dark room. A good place is a cabinet above the refrigerator. The refrigerator produces heat and when it rises, the temperature of the Mushbag increases by several degrees. An alternative is to use a heat mat.
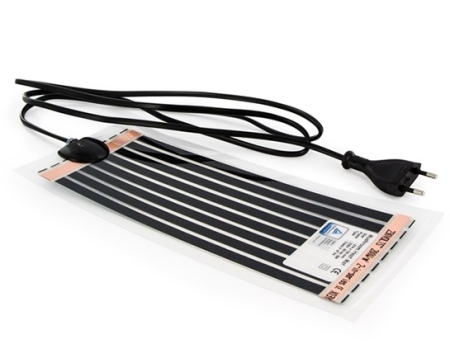
Always make sure there is some space between the heat mat and the Mushbag, otherwise it may dry out. For example, place a grid on top of the heat mat.
Make sure the air filter is free from the back of the bag. A temperature around 28 degrees Celsius is ideal. Lower temperatures (below 20 degrees Celsius) can slow down the growth process. The growth process of the mycelium stops almost completely at a temperature below 15 degrees Celsius.
5. Growth process of the mycelium
After about a week the bag starts to inflate slightly. Carefully break the grains loose by shaking the bag. This will speed up the growth process. Be careful not to damage the filter. It is important that the cereal grains collect again at the bottom of the bag.
About two to four weeks later, the soil is completely covered with mycelium. Now it's time for the next step. Being patient is an important factor here. The spores need time to grow further into mycelium.
Step 2: Preparing the culture container
Are all the grains covered with white mycelium? Then it's time to prepare the culture container. Did you know that mushrooms consist of more than 90% of water? Covering the mycelium with vermiculite will create a water reservoir for the mushrooms. The vermiculite will also ensure that the humidity in the grow bag is maintained. Below is explained step by step how to do this.
1. Break loose the grains
Take the Mushbag and carefully break loose the grains. You can also shake the bag. It can be difficult to break loose the grains because the mycelium has already formed thick slices. Gently knead the bag to break the lumps into smaller pieces. This is necessary to easily fill the culture container.
2. Preparing the vermiculite
Disinfect your work surface, for example a table top. Wash your hands thoroughly with soap and dry them with a clean towel or kitchen paper.
Add 50 ml of water to the bag of vermiculite and close the bag again.
Mix the vermiculite until it is completely moist by kneading the bag. This is easy if there is not too much air in the bag.
3. Fill the culture container
Work as clean as possible. Take the clean scissors and spoon.
Rinse the inside of the culture container and the lid under the tap. First fill the container. First with a layer of mycelium (the grains from the Mushbag). Fill the container but leave about 0.5 cm. Next, cover with a layer of moist vermiculite of about 0.5 - 1 cm thick. Try not to touch anything with your hands.
Use a clean pair of scissors to cut up the Mushbag and spread the different layers evenly over the growing container with the spoon. Do not press the mycelium too much. Make sure that the edges of the grow box are also covered with the different layers and that all the mycelium is covered with vermiculite.
Use the lid to close the container completely and put it in a dark and warm place (for example above the refrigerator).
After this, the mycelium needs time to grow through the vermiculite. The next step takes place in about one week, when all the grains are covered with mycelium again and the mycelium becomes visible through the layer of vermiculite (about 10-20%).
Step 3: Growth process of the mushrooms
Hooray! You now have your own grow box with substrate (the growing medium) in which the mycelium can grow. It won't be long before the first mushrooms will appear. Now follows the step of watering, so that enough moisture remains in the grow box for the mushrooms to grow.
1. Watering
Carefully open one corner of the grow box. Gently turn on the tap and let the container fill with water. The substrate should be completely under water. Close the container again with the lid and leave the container for 12 hours (e.g. on the countertop).
2. Pouring off the water
After 12 hours open one corner of the lid and carefully drain the excess water.
3. Grow
Wash your hands, remove the lid and place the container in the grow bag. Keep the lid as you will need it again later.
Fold the top of the grow bag (the opening) in half and close it with two paper clips. Place the bag in a warm place, preferably between 20 and 25 degrees Celsius. The mushrooms grow best and fastest at a temperature around 25 degrees Celsius.
Light must reach the bag, but not direct sunlight. Do not place the grow bag above the heater as it may dry out. After about 14 days the first mushrooms appear. These can grow to maturity within a few days to a week and can then be harvested.
4. Harvesting
The best time to harvest mushrooms is when the membrane at the bottom of the cap starts to tear. If you wait too long, this membrane will tear and the mushroom will drop its spores. This turns the mycelium and the inside of the bag black. This is harmless but it is better to harvest the mushrooms before this happens.
Mushrooms do not grow all at once, but in so-called flights, or 'flushes'. Pick all mushrooms that are ready and leave some if they are still developing. Small pinheads that do not continue to grow are better off left alone.
5. Next flush
After you have harvested your flight of mushrooms, you can prepare your grow box for the next flight. This is because you can harvest multiple times from one grow box!
Immediately after harvesting, carefully remove all undeveloped mushrooms so that you don't damage the culture medium.
Now repeat from step 3. Fill the cultivation box with water again, let it stand for 12 hours with a lid and then pour away the excess water. Place the container back in the grow bag and close it with the paper clips. Wait until the mushrooms start to grow and then it's harvest time!
Did you enjoy reading this article and do you like to write yourself? We are always looking for people who share our passion for natural products, who can also translate this into great texts. And we have an interesting reward for this. View all information for writers.
Spore Syringe Mazatapec
Psilocybe Cubensis Mazatapec Blog Cannabis
How to make weed brownies
Cannabis can be used for many things: the strong fibers are perfect to create paper and rope, the seeds contain healthy fats, but weed brownies are on [..]
06-10-2021
8 minutes
Blog Cannabis
How to make weed brownies
Cannabis can be used for many things: the strong fibers are perfect to create paper and rope, the seeds contain healthy fats, but weed brownies are on [..]
06-10-2021
8 minutes
 Blog Vaporizers
What is the best vaporizer for hash?
Do you want to use hashish in an effective, healthy and cheap way? In a coffeeshop hash is often even more expensive than weed buds. Of course you wan [..]
19-04-2023
8 minutes
Blog Vaporizers
What is the best vaporizer for hash?
Do you want to use hashish in an effective, healthy and cheap way? In a coffeeshop hash is often even more expensive than weed buds. Of course you wan [..]
19-04-2023
8 minutes
 Blog Smart Products
What are the Effects of Kratom and how does it work?
Effects from kratom, what can you expect? If you have ever visited the Sirius.nl online smartshop or been to one of our smartshops in person, then you [..]
Blog Smart Products
What are the Effects of Kratom and how does it work?
Effects from kratom, what can you expect? If you have ever visited the Sirius.nl online smartshop or been to one of our smartshops in person, then you [..]


 Nederlands
 Italiano
 Deutsch
 Français
 Português
 Español
 Polski